การใช้หลายโดเมนจะช่วยเพิ่มความสามารถในการใช้งาน ประสิทธิภาพและความสามารถในการปรับขนาดของ PHP แอปพลิเคชันอีกทั้งยังช่วยประหยัดค่าใช้จ่ายโดยไม่จำเป็นต้องตั้งค่าอินสแตนซ์แยกต่างหาก
ดังนั้นเรามาดูวิธีการรันหลายโดเมนบน PHP แอปพลิเคชันเซิร์ฟเวอร์เพื่อให้แอปพลิเคชันของคุณปรับขนาดได้และมีประสิทธิภาพมากขึ้น
1. เข้าสู่ระบบ Ruk-Com Cloud Dashboard
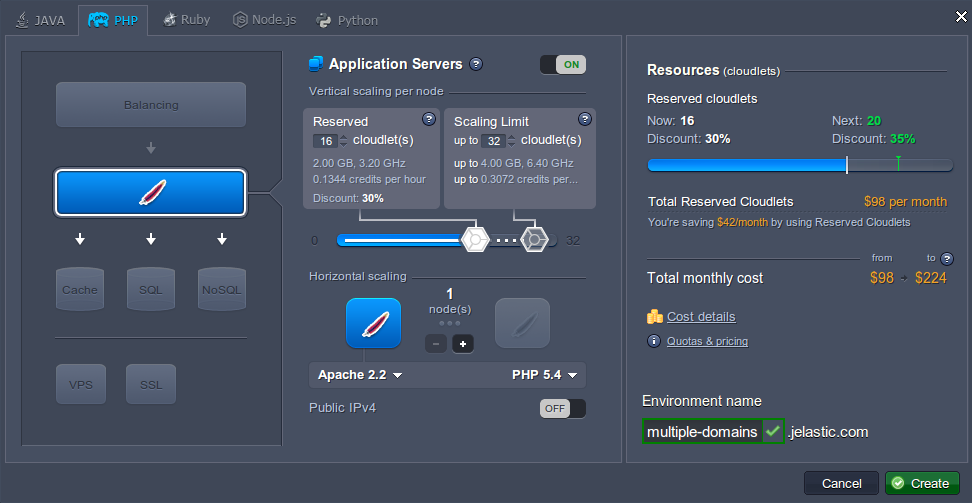
2. คลิกปุ่ม New Environment ด้านบนซ้ายของแดชบอร์ด
3. เมื่อหน้าต่างปรากฏให้เลือกที่แท็บ PHP เลือกแอปพลิเคชันเซิร์ฟเวอร์และระบุจำนวนทรัพยากรที่แอปพลิเคชันของคุณต้องการ หลังจากนั้นใส่ชื่อสำหรับการสร้าง environment และคลิกปุ่ม Create

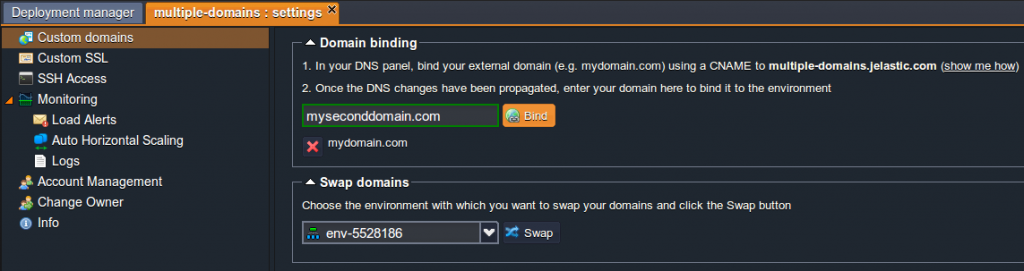
4. คุณต้องมีชื่อใน DNS เพื่อแก้ไขที่อยู่ IP ของคุณ ดังนั้นการซื้อชื่อโดเมนสำหรับ environment ของคุณสามารถทำได้สองวิธี: คือการเพิ่ม CNAME record หรือการตั้งค่า A Records คุณสามารถดูรายละเอียดเพิ่มเติมได้ที่นี่
5. หลังจากนั้นคลิกปุ่ม Settings ที่ environment ของคุณและทำการผูกโดเมน ตัวอย่างเช่น เราใช้ URL นี้: mydomain.com และ myseconddomain.com
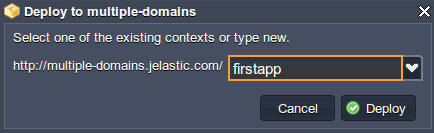
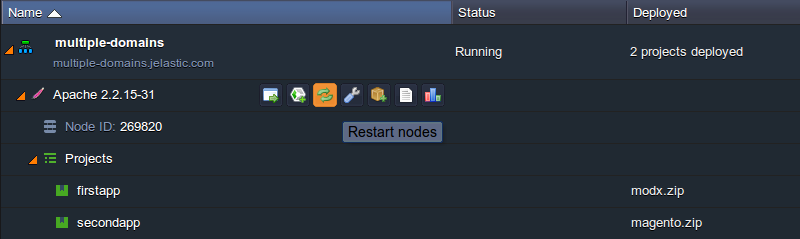
6. ตอนนี้คุณสามารถอัปโหลดแพ็กเกจ zip โดยไปที่ Deployment Manager และ deploy environment ของคุณที่สร้างไว้ก่อนหน้านี้

7. เมื่อแอปพลิเคชันของคุณ deploy สำเร็จแล้วคุณต้องกำหนดค่า virtual host ของคุณ
- สำหรับ Apache
คลิกปุ่ม Config ข้าง Apache เซิร์ฟเวอร์และเปิดไฟล์ httpd.conf (ในไดเร็กทอรี conf) เพื่อตั้งค่าพารามิเตอร์ VirtualHost สำหรับชื่อโดเมนสองชื่อแยกกันโดยระบุ path ไปยัง context ที่ปรับใช้และชื่อโดเมน:
Listen 80
<VirtualHost *:80>
    DocumentRoot /var/www/webroot/firstapp
    ServerName mydomain.com
    ...
</VirtualHost>
<VirtualHost *:80>
    DocumentRoot /var/www/webroot/secondapp
    ServerName myseconddomain.com
    ...
</VirtualHost>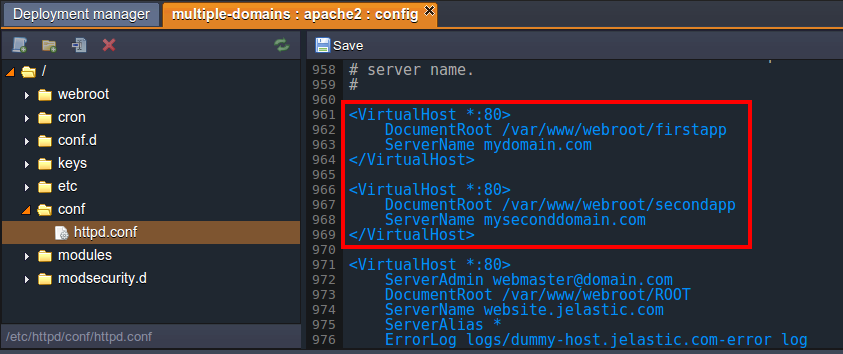
- สำหรับ NGINX
คลิกปุ่ม Config ข้าง NGINX server และเปิดไฟล์ nginx.conf ที่ conf ไดเร็กทอรี
ระบุการตั้งค่าของคุณในบล็อกเซิร์ฟเวอร์
server_name (โดเมนของคุณ)
ROOT (ข้อความที่คุณระบุขณะ deploy)
โปรดทราบว่าคุณต้องมีบล็อกเซิร์ฟเวอร์แยกต่างหาก ที่มีการตั้งค่าพร้อมสำหรับแต่ละโดเมนที่คุณผูก
server {
listen 80;
server_name localhost;
include /etc/nginx/aliases.conf;
location / {
root /var/www/webroot/ROOT;
index index.html index.htm index.php;
location ~ \.php$ {
location ~ /\. { deny all; access_log off; log_not_found off; }
include /etc/nginx/fastcgi_params;
fastcgi_pass 127.0.0.1:9000;
fastcgi_param SCRIPT_FILENAME /var/www/webroot/ROOT$fastcgi_script_name;
fastcgi_param PATH_INFO $fastcgi_script_name;
fastcgi_param DOCUMENT_ROOT /var/www/webroot/ROOT;
}
}
index index.php index.html index.htm;
error_page 500 502 503 504 /50x.html;
location = /50x.html {
root html;
}
location ~ /\. { deny all; access_log off; log_not_found off; }
location ~ \.php$ {
location ~ /\. { deny all; access_log off; log_not_found off; }
include /etc/nginx/fastcgi_params;
fastcgi_pass 127.0.0.1:9000;
fastcgi_param SCRIPT_FILENAME /var/www/webroot$fastcgi_script_name;
fastcgi_param PATH_INFO $fastcgi_script_name;
fastcgi_param DOCUMENT_ROOT /var/www/webroot;
}
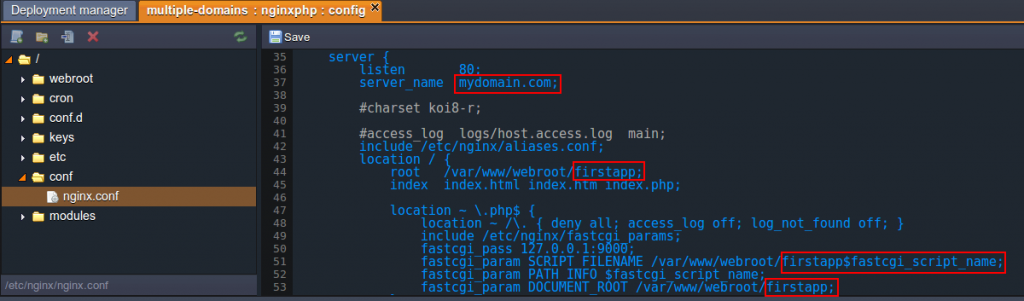
}ในกรณีของเรา การตั้งค่าดังนี้:
        server {
        listen       80;
        server_name  mydomain.com;

    include /etc/nginx/aliases.conf;
        location / {
            root   /var/www/webroot/firstapp;
            index  index.html index.htm index.php;

            location ~ \.php$ {
                location ~ /\. { deny all; access_log off; log_not_found off; }
            include /etc/nginx/fastcgi_params;
            fastcgi_pass 127.0.0.1:9000;
            fastcgi_param SCRIPT_FILENAME /var/www/webroot/firstapp$fastcgi_script_name;
            fastcgi_param PATH_INFO $fastcgi_script_name;
            fastcgi_param DOCUMENT_ROOT /var/www/webroot/firstapp;
            }

        }
        index  index.php index.html index.htm;

        error_page   500 502 503 504  /50x.html;
        location = /50x.html {
            root   html;
        }

            location ~ /\. { deny all; access_log off; log_not_found off; }

        location ~ \.php$ {
        location ~ /\. { deny all; access_log off; log_not_found off; }
            include /etc/nginx/fastcgi_params;
            fastcgi_pass 127.0.0.1:9000;
            fastcgi_param SCRIPT_FILENAME /var/www/webroot$fastcgi_script_name;
            fastcgi_param PATH_INFO $fastcgi_script_name;
            fastcgi_param DOCUMENT_ROOT /var/www/webroot;
        }

    }


server {
        listen       80;
        server_name  myseconddomain.com;

            include /etc/nginx/aliases.conf;
        location / {
            root   /var/www/webroot/secondapp;
            index  index.html index.htm index.php;

            location ~ \.php$ {
                location ~ /\. { deny all; access_log off; log_not_found off; }
            include /etc/nginx/fastcgi_params;
            fastcgi_pass 127.0.0.1:9000;
            fastcgi_param SCRIPT_FILENAME /var/www/webroot/secondapp$fastcgi_script_name;
            fastcgi_param PATH_INFO $fastcgi_script_name;
            fastcgi_param DOCUMENT_ROOT /var/www/webroot/secondapp;
            }

        }
        index  index.php index.html index.htm;

        error_page   500 502 503 504  /50x.html;
        location = /50x.html {
            root   html;
        }

    location ~ /\. { deny all; access_log off; log_not_found off; }

    location ~ \.php$ {
        location ~ /\. { deny all; access_log off; log_not_found off; }
            include /etc/nginx/fastcgi_params;
            fastcgi_pass 127.0.0.1:9000;
            fastcgi_param SCRIPT_FILENAME /var/www/webroot$fastcgi_script_name;
            fastcgi_param PATH_INFO $fastcgi_script_name;
            fastcgi_param DOCUMENT_ROOT /var/www/webroot;
        }

    }
8. อย่าลืมบันทึกการเปลี่ยนแปลงและรีสตาร์ทแอปพลิเคชันเซิร์ฟเวอร์เพื่อปรับใช้การตั้งค่าใหม่
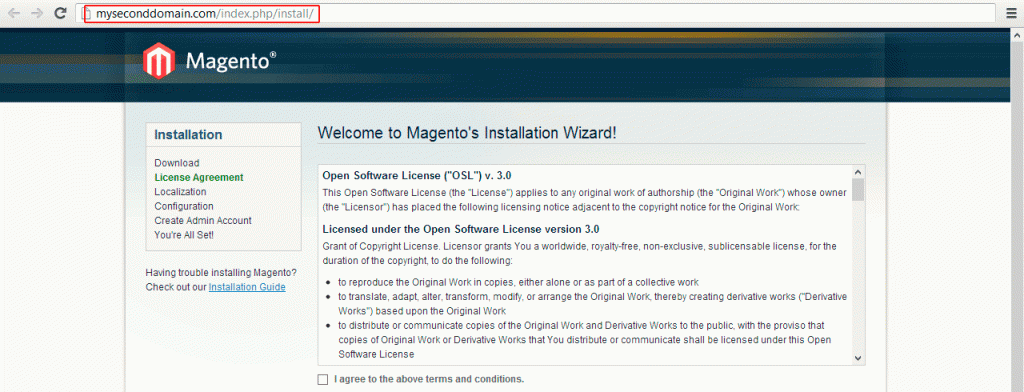
9. ตอนนี้คุณสามารถตรวจสอบผลลัพธ์เพื่อให้แน่ใจว่าทุกอย่างทำงานได้อย่างถูกต้อง
หวังว่าคำแนะนำนี้จะเป็นประโยชน์สำหรับคุณ ชื่อโดเมนเป็นข้อมูลที่สำคัญสำหรับการระบุตัวตนออนไลน์ดังนั้นอย่าลืมปกป้องชื่อเหล่านี้ด้วย Ruk-Com Cloud โดยใช้เวลาเพียงไม่กี่นาที